Hello all, if you are reading this then chances are you are looking to figure out how to code an image gallery using 11ty (a static site generator) for your site. An image gallery can be for photgraphs or art, or whatever graphic you want to add. Since I have been asked about how I make my galleries, I will be covering two methods to create an art gallery, based on personal preference. This tutorial may be periodically updated if I find new ways to improve the workflow and codes, as well as correcting any mistakes.
You can see what mine looks like here:
- Method 1 - Recommended for portfolio sites to showcase works or for references, where you don't need to share a whole archive of your works.
- Method 2 - Recommended if you want to recreate the "old internet" art gallery site experience (aka DeviantArt) and want to create an online archive of your works.
Disclaimer: I am a hobbyist web developer who only uses these techniques, many of which I experimented with myself through trial and error, to create indie static sites. I am not claiming expertise and if you know of a better workflow than the one I use, please use it! (And if you are willing, it would be awesome if you can share it with me as well.)
To create an image gallery with either method, you will need:
- Knowledge of basic HTML and CSS
- A source-code editor (I use Phoenix Code, but you may have heard of Visual Code Studio)
- Eleventy (11ty) installed on your site, and anything that 11ty requires (including node.js)
- Understanding of how to use 11ty.
This guide will assume you already have knowledge of using 11ty to build your site. I strongly recommend you read through the documentation to set up your site and getting used to 11ty before delving into creating a gallery with 11ty. You don't need to be a wizard at 11ty to create this gallery though. I only started using 11ty less than a month ago from when this post is created!
Additional recommended reading:
- Flamed Fury's 11ty & Neocities Guide - the tutorial I personally used to set up my Neocities site.
- 11ty Collections - 11ty's official documentation on creating "collections" and using tags.
Based on which style of art gallery you want, you can scroll to that one and skip the other method section. Good luck coding!
Method 1: Lightbox Gallery with Button Filters
(Click to see full-view)
Features include:
- An interactive lightbox. I use this code by Lokesh Dhakar and will be referring to it in the tutorial.
- Simple code that can be done without 11ty (11ty is only needed to generate the layout for this method)
- Javascript buttons and filters
- Optional: Putting your image data into a
.jsonfile for 11ty to generate so you don't need to update the actual html when you add new images to it.
Cons:
- Not great for a full image archive due to loading times, which can make your site load slower if there are too many images.
- Relies on javascript, so anyone with javascript disabled can not use the filters or view an image with the lightbox.
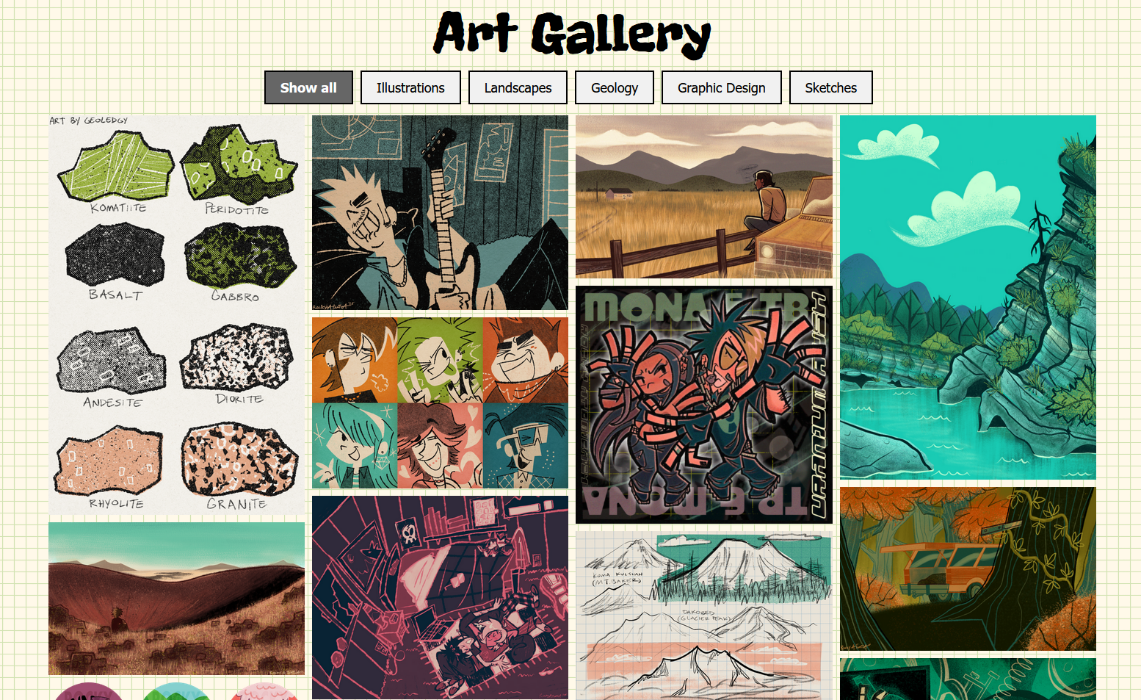
This gallery layout (example) is meant to display featured images in a lightbox/slideshow arrangement in a gallery and uses javascript buttons to filter your images.
To start, download the lightbox.js and lightbox.css and dist directory files from lightbox2. You will then place each file in your respective src/js and src/css directories (or wherever you store your .js and .css files) and personally I just copied everything in dist and dropped in my src/img/assets directory. Yours might look slightly different if they are in different directories from mine) and then include the following in your base.njk file:
base.njk
<head>
<!--lightbox-->
    <link rel="stylesheet" type="text/css" href="/css/lightbox.css" media="screen" />
    <script type="text/javascript" src="/js/lightbox.js"></script>
</head>
Having both of these codes in the head allows us to use this lightbox function for different pages if you want separate galleries (example: if you have a page for characters and wish to put together a separate gallery to showcase their art and references.)
Now you can add your images directly to your code by using this code:
index.html
<body>
    <a href="IMAGE URL or THUMBNAIL IMAGE URL" data-lightbox="gallery" data-title="TITLE">
        <img src="IMAGE URL" alt="ALT TEXT"/></a>
</body>
And it is that easy! You will need to do this for every image you want to upload in the gallery. The data-lightbox="gallery" is what tells the code if you want a collection of images or individual images. A collection would all have the same name under data-lightbox, and the code will put it in a slideshow when someone opens up the lightbox where users can click on previous and next arrows.
To have your images only pop-up in the lightbox but not have the slideshow functionality, you will need to write a different name for each post, such as "image1", "image2", "image3", and so on. This tells the code your images are not realated to each other.
index.html
<body>
    <a href="IMAGE URL or THUMBNAIL IMAGE URL" data-lightbox="image1" data-title="TITLE">
        <img src="IMAGE URL" alt="ALT TEXT"/></a>
    <a href="IMAGE URL or THUMBNAIL IMAGE URL" data-lightbox="image2" data-title="TITLE">
        <img src="IMAGE URL" alt="ALT TEXT"/></a>
    <a href="IMAGE URL or THUMBNAIL IMAGE URL" data-lightbox="image3" data-title="TITLE">
        <img src="IMAGE URL" alt="ALT TEXT"/></a>
</body>
Next, we are going to add filters to the gallery. These are the buttons that you see on the top of my gallery. Make as many categories as you need and make sure to include a "Show all" button so all your images can be displayed. I like to put my buttons into a container to keep them in one place:
index.html
<body>
    <div id="buttoncontainer">
        <button class="btn active" onclick="filterSelection('all')"><b>Show all</b></button>
        <button class="btn" onclick="filterSelection('Category1')">Category1</button>
        <button class="btn" onclick="filterSelection('Category2')">Category2</button>
        <button class="btn" onclick="filterSelection('Category3')">Category3y</button>
        <button class="btn" onclick="filterSelection('Category4')">Category4</button>
        <button class="btn" onclick="filterSelection('Category5')">Category5</button>
    </div>

    <a href="IMAGE URL or THUMBNAIL IMAGE URL" data-lightbox="gallery" data-title="TITLE">
            <img src="IMAGE URL" alt="ALT TEXT"/></a>
</body>
Now go back to where you added your gallery and include filter [Category Name] in a div class to the beginning of your image and image link:
index.html
<body>
    <div id="buttoncontainer">
        <button class="btn active" onclick="filterSelection('all')"><b>Show all</b></button>
        <button class="btn" onclick="filterSelection('Category1')">Category1</button>
        <button class="btn" onclick="filterSelection('Category2')">Category2</button>
        <button class="btn" onclick="filterSelection('Category3')">Category3y</button>
        <button class="btn" onclick="filterSelection('Category4')">Category4</button>
        <button class="btn" onclick="filterSelection('Category5')">Category5</button>
    </div>

    <div class="filter Category1">
        <a href="IMAGE URL or THUMBNAIL IMAGE URL" data-lightbox="gallery" data-title="TITLE">
            <img src="IMAGE URL" alt="ALT TEXT" /></a>
    </div>
</body>
You can add as many filters as you want for a single image:
index.html
<body>
    <div id="buttoncontainer">
        <button class="btn active" onclick="filterSelection('all')"><b>Show all</b></button>
        <button class="btn" onclick="filterSelection('Category1')">Category1</button>
        <button class="btn" onclick="filterSelection('Category2')">Category2</button>
        <button class="btn" onclick="filterSelection('Category3')">Category3y</button>
        <button class="btn" onclick="filterSelection('Category4')">Category4</button>
        <button class="btn" onclick="filterSelection('Category5')">Category5</button>
    </div>

    <div class="filter Category1 Category2">
        <a href="IMAGE URL or THUMBNAIL IMAGE URL" data-lightbox="gallery" data-title="TITLE">
            <img src="IMAGE URL" alt="ALT TEXT" /></a>
    </div>
    <div class="filter Category1 Category3 Category5">
        <a href="IMAGE URL or THUMBNAIL IMAGE URL" data-lightbox="gallery" data-title="TITLE">
            <img src="IMAGE URL" alt="ALT TEXT" /></a>
    </div>
</body>
But there is no need to include ALL filters into a single image. The script assumes by default that every image will be included in "show all". If you made it here then congrats! You've made an image gallery that utilizes lightbox and filters! For reference, here is an exmaple of what my own basic code looks like:
index.html
<head>
    <link rel="stylesheet" href="/css/styles.css" />

<!--lightbox-->
    <link rel="stylesheet" type="text/css" href="/css/lightbox.css" media="screen" />
    <script type="text/javascript" src="/js/lightbox.js"></script>
</head>
<body>
    <div id="buttoncontainer">
        <button class="btn active" onclick="filterSelection('all')"><b>Show all</b></button>
        <button class="btn" onclick="filterSelection('illustrations')">Illustrations</button>
        <button class="btn" onclick="filterSelection('landscapes')">Landscapes</button>
        <button class="btn" onclick="filterSelection('geology')">Geology</button>
        <button class="btn" onclick="filterSelection('graphicdesign')">Graphic Design</button>
        <button class="btn" onclick="filterSelection('sketches')">Sketches</button>
    </div>

    <div id="gallery" class="columns">
        <div class="filter landscapes">
            <a href="https://geoledgy.com/img/2025-11-21.png"
            data-lightbox="gallery"
            data-title="Igneous Rocks">
                <img src="https://geoledgy.com/img/2025-11-21.png" /></a>
        </div>
        <div class="filter landscapes">
            <a href="https://geoledgy.com/img/2025-11-11.png"
            data-lightbox="gallery"
            data-title="S P Crater">
                <img src="https://geoledgy.com/img/2025-11-11.png" /></a>
        </div>
        <div class="filter geology graphicdesign">
            <a href="https://geoledgy.com/img/2025-09-27.png"
            data-lightbox="gallery"
            data-title="Geologic Resources Buttons">
                <img src="https://geoledgy.com/img/2025-09-27.png" /></a>
        </div>
        <div class="filter landscapes geology">
            <a href="https://geoledgy.com/img/2025-09-26.png"
            data-lightbox="gallery"
            data-title="Wheeler Geologic Park">
                <img src="https://geoledgy.com/img/2025-09-26.png" /></a>
        </div>
        <div class="filter illustrations">
            <a href="https://geoledgy.com/img/2025-08-09.png"
            data-lightbox="gallery"
            data-title="Mona & TB">
                <img src="https://geoledgy.com/img/2025-08-09.png" /></a>
        </div>
    </div>
</body>
From here on, you can style your site with lightbox.css and also add divs to index.html (with your main stylesheet, styles.css in this case for me) as you see fit.
Known issues for this method:
- When on a filter and using the lightbox nagivation, the images disregards the filter. I haven't figured out the workaround for this yet.
Method 1: Optional
You can also create a .json file to store information for the images in and then generate the code using 11ty, rather than having to manually update the html each time you add a new image. You will need to create a _.json file:
TBA...I am figuring this out right now...
Method 2: Image link gallery and individual posts

(Click to see full-view)
Features include:
- Each image links to its own post page with minimal code.
- Working tags and tags page.
- Optional comments section.
- Utilizes 11ty's built-in collections feature.
- No javascript on your gallery and posts (unless you use the comment widget and the "return to top" button I have .)
Cons:
- The learning curve for 11ty may be steep, depending on your current knowledge of coding.
- Will require more storage space due to additional pages for individual posts, tags, gallery pagination.
- 2nd level pagination/nested pagination (to divide collections into categories first and then tags) is currently not a feature in 11ty and must be imported in configuration file (and I didn't do this).
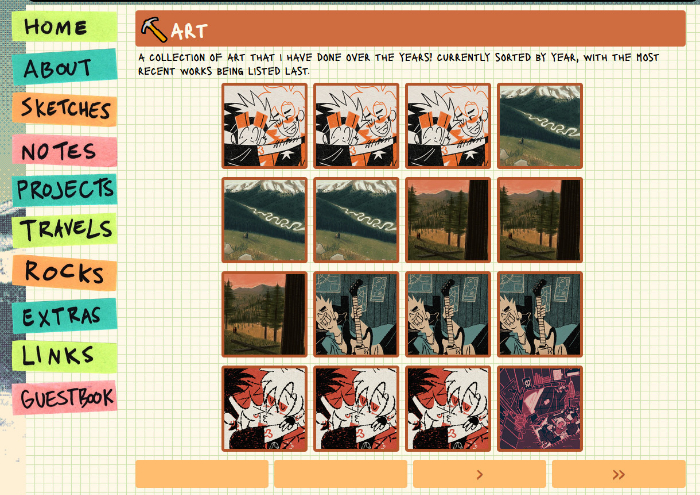
This gallery layout (gallery example and post example ) allows for your images to be clicked on to lead to a separate post that contains space for information, tags, longer alt text, more images in a single post (like Pixiv or Instagram) and even possibly a comments section for each post! It is reminiscent of older art gallery websites, such as deviantArt. Each post is actually an 11ty blog post and functions the same way as so. This means they can have their own tags and a page containing the tags can be generated without you having to do so manually. And while this gallery layout and format CAN be done all manually without 11ty...it is the most tedious work ever because you will need to update every tag page and gallery pagination when you make changes.
Once you have read 11ty's documentation on how to set up a blog (here is a video for my visual learners), you are going to do the same thing but with your art. I will be doing the same thing except make it specific to building an image gallery. You will need to make a new collection for your art posts, I call mine collections.art but you can call it anything you want, just make sure it follows this format: collections.[category]. I willl show you how below:
Basics
Under the src directory, make a new directory folder where all your posts will be written. I named mine art.
mkdir art
In the src/art directory, create art1.md, art2.md, art3.md, and art.json. You can always change the name of these files later for better organization but for tutorial purposes, we will be doing this. The .json file, however, should always match the name of your directory. Since we are using markdown for our posts, we can actually use a combination of markdown and HTML (just remember to put the proper spaces between HTML so it will code properly).
Go to your src/img directory and make a new directory thumbnails. Here is where you can upload thumbnail images. I typically make mine a 150x150 sqaure.
mkdir thumbnails
Open up your code editor and go and add the following front matter data to each respective file in src/art. "FILENAME" is the name of your thumbnail, for example mine is thumbnail: 2025-06-08.png. For permalinks, I like to further divide my art by year craeated, so I use permalink: "/art/2025/2026-01-14.html"
art1.md
---
title: My first art post
date: [DATE CREATED/POSTED]
thumbnail: /img/thumbnails/FILENAME
permalink: "/art/[YEAR]/{{page.fileSlug}}.html"
---

This is my first art post!
art2.md
---
title: My second art post
date: [DATE CREATED/POSTED]
thumbnail: /img/thumbnails/FILENAME
permalink: "/art/[YEAR]/{{page.fileSlug}}.html"
---

This is my second art post!
art3.md
---
title: My third art post
date: [DATE CREATED/POSTED]
thumbnail: /img/thumbnails/FILENAME
permalink: "/art/[YEAR]/{{page.fileSlug}}.html"
---

This is my third art post!
art.json
{
    "layout": "/layouts/art",
    "tags": "art"
}
The art tag in the .json file globally allows all posts in the src/art directory to be part of collections.art, so we don't need to individually type it every time to add to the collection.
Now, we are going to make the layout for your art posts. Go to _includes/layouts and create a new layout file, art.njk. This will be the layout for an individual art post, like this page. If you want to use your main layout for this, add this to the top of your art.njk your code:
art.njk
---
layout: /layouts/base.njk
permalink: "/art/"
---

<article>{{ content | safe }}</article>
Optional step: For me, I chose to make a slightly different layout base (one without the sidebar) for my posts, so I duplicated my base.njk, renamed it to base2.njk and removed the nav on deskstop view, and directed my art.njk layout to refer to that one:
art.njk
---
layout: /layouts/base2.njk
permalink: "/art/"
---

<article>{{ content | safe }}</article>
Now go back to your src directory and make a new html file. I name mine art.html but gallery.html will work too. This is where your gallery will be displayed, like this page. If you want your images to display, use this code (You dont need to add yours in a div, but it will make things cleaner):
art.html
<div class="gallery">
  {% for post in collections.art | reverse %}
  <a href="{{ post.url }}"><img src="/img/art/thumbnails/{{ post.data.thumbnail }}" loading="lazy" /></a> {{ post.data.dateString }}
  {% endfor %}
</div>
Reverse tells 11ty to load your posts in reverse chronological order, from most recent to oldest post, based on the dates added to the front matter.
It is very similar to the code that is used to display blog posts, except instead of a list, we are making an image gallery. You should already know how to use an image as a link.
Adding content to the post
Go to _input/layouts/art.njk in your code editor.
It's good to already have a general idea of what you want your page to look like. Here, I have a sketch of my layout before I coded it:
[image]
The title is taken from base.njk and does not appear in this code file. I wanted the pagination to be on top to take users to the next and previous posts, with a center button that returns the user to the main gallery page.
art.njk
<!-- Pagination -->
<p>
{% set previousPost = collections.art | getPreviousCollectionItem(page) %}
{% set nextPost = collections.art | getNextCollectionItem(page) %}
{% include "../partials/paginate.njk" %}
</p>
You will notice I also made a partial, paginate.njk under _includes/partials:
paginate.njk
<div id="pagination">
    <div id="next">
{% if nextPost %}
        <a href="{{ nextPost.url }}">← Next</a>
    {% endif %}
    </div>

    <div id="back"><a href="javascript:window.history.back();">Back to main</a>
    </div>

    <div id="previous">
    {% if previousPost %}
        <a href="{{ previousPost.url }}">Previous →</a>
    {% endif %}
    </div>
</div>
Underneath the pagination is where the markdown file (art1.md, art2.md, art3.md) will be injected:
art.njk
<!-- Pagination -->
<p>
{% set previousPost = collections.art | getPreviousCollectionItem(page) %}
{% set nextPost = collections.art | getNextCollectionItem(page) %}
{% include "../partials/paginate.njk" %}
</p>

<section>
    <article>
	   {{ content | safe }}
    </article>
</section>
Underneath the content, I added a space to display the date created (see this documentation for adding and formatting dates to 11ty):
art.njk
<!-- Pagination -->
<p>
{% set previousPost = collections.art | getPreviousCollectionItem(page) %}
{% set nextPost = collections.art | getNextCollectionItem(page) %}
{% include "../partials/paginate.njk" %}
</p>

<section>
    <article>
	   {{ content | safe }}
    </article>
</section>

<div class="text">
    Created: {{ page.date.toLocaleString( undefined, { year: 'numeric', month:
      'long', day: 'numeric' })}}
</div>
For the comment widget, I chose Ayano's comment widget, which provides me with a very simple line of code. I really like this widget because I can use it for any page I want, and it only displays comments for the respective page it received the comment on (Please refer to this documentation to implement this comment widget. From what I hear, only Neocities with Supporter accounts can use it right now).
art.njk
<!-- Comment widget -->
<div id="c_widget"></div>
<script src="/js/comment-widget.js"></script>
And once I know my posts can get pretty long, I added a "Return to top" javascript button at the bottom of my page, and at the bottom of my code:
art.njk
<!-- Return to top -->
 <button onclick="topFunction()" id="returntopbutton" title="Return to top">Return to top</button>

<script>
    // Get the button:
    let topbutton = document.getElementById("returntopbutton");

    // When the user scrolls down 20px from the top of the document, show the button
    window.onscroll = function() {scrollFunction()};

    function scrollFunction() {
      if (document.body.scrollTop > 20 || document.documentElement.scrollTop > 20) {
        topbutton.style.display = "block";
      } else {
        topbutton.style.display = "none";
      }
    }

    // When the user clicks on the button, scroll to the top of the document
    function topFunction() {
      document.body.scrollTop = 0; // For Safari
      document.documentElement.scrollTop = 0; // For Chrome, Firefox, IE and Opera
    }
</script>
Tags
We are almost done setting up our gallery site! But what if a visitor only wanted to see my volcano art? How would they be able to filter that? This is where tags come in.
Adding tags to posts is quite simple in 11ty, as all you need to do is add it to an individual post's front matter. Go ahead and open up art1.md in your code editor:
art1.md
---
title: My first art post
date: [DATE CREATED/POSTED]
thumbnail: /img/thumbnails/FILENAME
permalink: "/art/[YEAR]/{{page.fileSlug}}.html"
tags: ["volcano"]
---

This is my first art post!
You can add multiple tags too, each separated by a comma(,):
art1.md
---
title: My first art post
date: [DATE CREATED/POSTED]
thumbnail: /img/thumbnails/FILENAME
permalink: "/art/[YEAR]/{{page.fileSlug}}.html"
tags: ["volcano", "cinder cone", "sunset crater"]
---

This is my first art post!
Go to _input/layouts/art.njk and include this code to display tags on your post where you want them to go. In my case, I had them placed underneath "article":
art.njk
<article>
    {{ content | safe }}
</article>
<ul class="tags">
        {% for tag in tags %}
        <li class="tags">
            <a href="/art/tagged/{{ tag | slugify }}" class="tags" >#{{ tag }} </a>
        </li>
        {% endfor %}
    </ul>
If you were to run 11ty, your tags will show up and include the "art" tag. But what if you DON'T want that as part of your tags?
You will first need to go to your eleventy configuration file (.eleventy.js for me) and add this code. I place mine under the passthrough codes and above the return codes:
.eleventy.js
module.exports = function (eleventyConfig) {
// Exclude certain tags from displaying
    eleventyConfig.addFilter("exclude", (arr, exclude) => arr.filter((el) => el !== exclude));
    eleventyConfig.addFilter("limit", (arr, limit) => arr.slice(0, limit));
    eleventyConfig.addCollection("tagList", (collections) => {
        const tags = collections
            .getAll()
            .reduce((tags, item) => tags.concat(item.data.tags), [])
            .filter((tag) => !!tag && !["post", "featured", "popular", "opinion", "all"].includes(tag))
            .sort();
        return Array.from(new Set(tags)).map((tag) => ({
            tag,
            count: collections.getFilteredByTag(tag).length
        }));
    });
    eleventyConfig.addFilter("findTagCount", (tagList, findTag) => tagList.find(({ tag }) => tag === findTag)?.count);
};
Then go to _input/layouts/art.njk again and add the exclude tag code:
art.njk
<article>
    {{ content | safe }}
</article>
<ul class="tags">
        {% for tag in tags | exclude("art") %}
        <li class="tags">
            <a href="/art/tagged/{{ tag | slugify }}" class="tags" >#{{ tag }} </a>
        </li>
        {% endfor %}
    </ul>
Once you do this, run 11ty again. The "art" tag won't show up in your list of tags anymore.
Finally, let's tell 11ty to generate tag pages for us so we can find all related posts that share the same tag.
Go to the src directory and make a new file, tag.html and add this code, including front matter data to it:
tag.html
---
pagination:
    data: collections
    size: 1
    alias: tag
    addAllPagesToCollections: true
    filter:
        - art
layout: layouts/base.njk
permalink: "/art/tagged/{{ tag | slugify }}/index.html"
eleventyComputed:
    title: Art tagged with "{{ tag }}"
---

<!-- Where images go -->
<div class="gallery">
    <!-- Images displayed here -->
    {% for post in collections[tag] | reverse %}
    <a href="{{ post.url }}"><img src="/img/art/thumbnails/{{ post.data.image }}" loading="lazy" /></a>
    {% endfor %}
</div>
This code will generate pages for you that display each of your tags. Here is an example of a tag page that was generated with 11ty.
Go ahead and run 11ty now. You should be able to see and interact with your gallery!
Known issues:
- If you have multiple collections on your site like me (art, blog, travels), 11ty will have some difficulty generating tag pages and will attach every tag to every collection.
- My current workaround for this is to add every tag I don't want it to look at in the front matter of each
tag.htmlpage under filter...it can be very tedious especially if you use a lot of tags, but it gets the job done! - Another way is to manually delete the files under
publicthat I don't want. Still a lot of tedious work though. I am currently experimenting with methods to reduce the work for this to work.
If you are reading this, it's likely you made it through so congratulations for creating an art gallery with 11ty! Let's take the internet back and not heavily rely on social medias to archive our art anymore.
Possible future additions:
- Gallery pagination
- Displaying all tags
FAQ
Q: I don't have a supporter account and am concerned about file size. Should I use an external image hosting?
A: So I actually forgot about the 1 GB file limit on Neocities when I wrote this because it has never been an issue to me...but if it helps, I currently have 3 websites and have not reached 1 GB total yet, even with images uploaded on them (turns out, 1 GB is a LOT!!!). While I currently have a supporter account, I did not until recently. (I have 3 sites because I previously supported Neocities in the past, but then cancelled my sub after taking a hiatus from coding - my storage reverted back to 1 GB but I could still access and edit my other sites).
I personally am against using external image hosting sites because I don't trust the longevity of them. Popular free image hosting sites from back in the day like Photobucket and Imageshack are unusable or require you to pay now, Imgur is unreliable, and who knows if other sites might shut down one day and your image links all break? It is much easier to host in your files on Neocities. That way you can just use filepaths in the event your site changes domain/URL or you want to host it elsewhere not on Neocities.
Q: I am still worried about image size taking up my limited storage. How can I share my art and still have plenty of space leftover?
A: I don't think you need to post your original size 459053 x 934580 px HD piece and never understood this choice. There is a reason many sites compress your posted image. Not only does this take up a lot of precious storage space, but it also lags your site to hell and cause it to load for a much longer while. All that energy used to display an image that won't even fit someone's computer screen unecessarily contributes to your website's carbon footprint as well as make your site less accessible. The purpose of a Neocities is to have a relatively usable personal site that can also be shared, otherwise if this doesn't appeal to you and you don't want to share it, just make the site on your local disk, save it to some CD's or flashdrive, and distribute to your friends and family.
The hard truth is most people aren't going to zoom in to the piece at x5000% magnification to rub their pupils on every single pixel you made. It is preferable if your full-size piece can be formatted to fit screens without scrolling (with an option to magnify). The only people who should be seeing the original full size image in its glory are yourself in your own local files, your merch suppliers and manufacturers (if you have any), and if it is a client piece, your commissioners.
My personal reccommendation is to have your large pieces be resized to 1000 px MAX (which ever is the longer side, or pick width or height for all your pieces). I use EZGif to resize my images and then their optimization tool to further compress my image so the file size is smaller. There is no noticable change to my pieces when I do this. If you resize and optimize your art, then you will have a lot of room to host your site images.
Q: Can you do an 11ty tutorial/template for [a gallery feature that was on deviantArt]?
A: Unless it is something that I have already implemented on my own gallery, no. It's likely I didn't feel a need for this feature or it seemed too complex for me to want to try coding at this time. You are free to figure it out yourself though!
Q: Can you teach me how to code with 11ty?
A: Only if you pay me for my time. There are countless of FREE resources out there on 11ty, and I can provide you with some reccommendations:
- 11ty - I cannot stress how important it is to look at the documentations on 11ty for you to look at and learn yourself. It will show you what 11ty can do and you can get ideas for how to code your own stuff with it.
- Flamed Fury's 11ty & Neocities Guide - This tutorial is what I used to set up 11ty. The author wrote in a simple way that I could easily follow along. I also would practice the workflow by making throwaway directories and learning through repitition as this is my preferred method of learning new skills.
- 6 Minutes to Build a Blog from Scratch with Eleventy video - Visual video tutorial on setting up 11ty. As a hands-on learner, I watched the video once. I then played it again while my code editor is open so I also could follow along. I repeated like 4-5 times.
- Looking through an 11ty user's source code - It's very helpful to explore files to see how someone has theirs set up. 11ty requires a particular configuration of files, folders, and commands in order to work correctly.
Q: Can the 11ty-generated gallery be created without 1ty?
A: If you have the time and patience, yes. You probably would just have to manually change all your links whenever you upload something new on both the gallery page and the tag pages. It might work better without pagination in this case. I DID find some other resources if you don't like any of my options and/or prefer to use an existing template rather than putting yourself through the torture nexus to build a gallery from scratch like I did:
Note: I did much of the experimentation with this code to make a working art gallery with 11ty all by myself due to no documentation for this, yet there are so many artists that are unhappy with the state of artist sites nowadays (hence why I decided to write this down), spending countless hours into making the code work so I can hopefully share this with others as well. If you'd like to support me for my hard work, I have a Ko-Fi! Or you can drop a nice comment below :] (Also, crediting is not required at all, but it'd be nice to link this tutorial so others can find it!)